

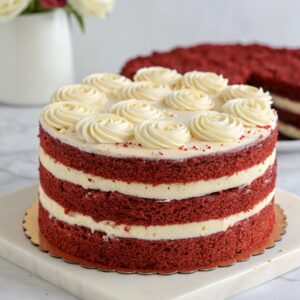
This 3 Layer Microwave Red Velvet Cake is a game-changer for anyone craving a decadent dessert in record time. With its moist, velvety crumb and rich cocoa flavor, it’s a treat that feels indulgent yet effortless. The vibrant red layers are perfectly complemented by a creamy, smooth frosting that melts in your mouth. Best of all, it’s ready in just 35 minutes, making it ideal for last-minute celebrations or spontaneous sweet cravings.
Each bite delivers a delightful contrast of textures—soft, tender cake paired with luscious frosting that’s both sweet and tangy. The microwave method ensures a quick bake without sacrificing flavor or quality. Whether you’re a baking novice or a seasoned pro, this recipe promises a show-stopping dessert that’s as easy to make as it is to enjoy.
Ingredients for 3 Layer Microwave Red Velvet Cake
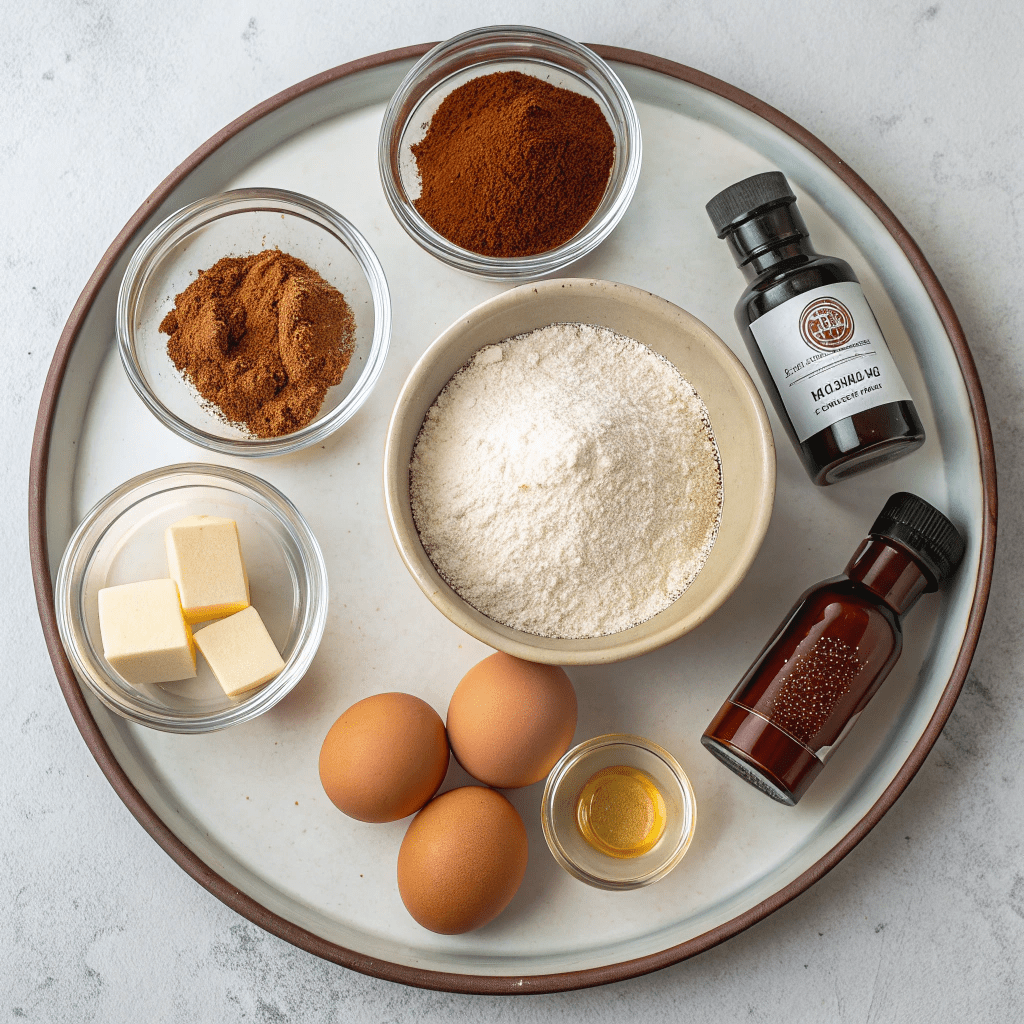
- 2½ cups (12½ oz/ 375g) all-purpose flour
- 1½ cups (12 oz/ 360g) sugar
- 1 teaspoon cinnamon
- 3 tablespoons cocoa powder, sifted
- 1½ teaspoons baking soda
- 1 teaspoon salt
- 2 large eggs, at room temperature
- 1 cup (8 fl oz/ 240g) vegetable oil
- 1 cup (8 oz/ 224g) buttermilk (or substitute with 1 cup milk + 1 tablespoon lemon juice or vinegar, let sit for 5 minutes)
- 2 tablespoons red food coloring (gel or paste recommended for vibrant color)
- 2 teaspoons vanilla extract
- My Best Ever Cream Cheese Frosting (prepare separately)
Step-by-Step Instructions
- Prepare the pans: Grease 3 x 7¼-inch silicone cake pans (or use a 6, 8, or 9-inch microwave-safe dish) and set aside.
- Mix dry ingredients: In a large bowl, whisk together the flour, sugar, cinnamon, cocoa powder, baking soda, and salt.
- Combine wet ingredients: In a separate jug, whisk together the eggs, vegetable oil, buttermilk, red food coloring, and vanilla extract.
- Combine wet and dry ingredients: Pour the wet ingredients into the dry ingredients and whisk until just combined. Do not overmix to avoid a tough cake.
- Divide the batter: Evenly distribute the batter between the 3 prepared silicone cake pans.
- Microwave the layers: Microwave each layer separately for 2 minutes and 30 seconds, checking at the 2-minute mark to ensure it doesn’t overbake. The cake is done when a toothpick inserted comes out clean.
- Cool the cakes: Remove each layer from the microwave and let cool completely before turning out onto a flat surface.
- Prepare the frosting: While the cakes cool, make the cream cheese frosting and chill until needed.
- Assemble the cake: Place one cake layer on a cake stand. Spread about ¼ cup of frosting evenly using an offset spatula. Repeat with the remaining layers.
- Apply the crumb coat: Frost the outside of the cake with a thin, even layer of frosting to seal in crumbs. Refrigerate for 30 minutes to set.
- Add the final frosting layer: Apply a generous second layer of frosting, smoothing it over the top and sides of the cake. Create decorative swirls on top.
- Decorate: Sprinkle red velvet crumbs or other decorations on top as desired.
- Store: Cover the cake with cling wrap and refrigerate for up to 4 days.
Perfect Pairings: Sauce and Topping Ideas
While the cream cheese frosting is a classic choice, consider drizzling a chocolate ganache over the top for an extra indulgent touch. Alternatively, a sprinkle of crushed pecans or white chocolate shavings can add a delightful crunch and visual appeal. For a fruity twist, serve with a side of raspberry coulis or fresh berries.
Time-Saving Tips for Busy Bakers
To streamline the process, pre-measure all your ingredients before starting. If you’re short on time, use a store-bought cream cheese frosting instead of making it from scratch. Additionally, you can microwave all three cake layers simultaneously if your microwave is large enough, just be sure to rotate the pans halfway through for even cooking.
Storage and Reheating Made Easy
Store your cake in the fridge, covered with cling wrap, for up to 4 days. If you prefer a room-temperature cake, let it sit out for about 30 minutes before serving. For longer storage, wrap individual slices in plastic wrap and freeze for up to 2 months. Thaw in the fridge overnight when ready to enjoy.
Recipe Variations to Try
Experiment with different flavors by swapping the red food coloring for other colors like green for a festive holiday cake or blue for a unique twist. You can also replace the buttermilk with plain yogurt or a dairy-free alternative like almond milk mixed with a teaspoon of vinegar. For a nutty flavor, add chopped walnuts to the batter.
Equipment Guidance for Best Results
Ensure your silicone cake pans are microwave-safe and properly greased to prevent sticking. If you don’t have silicone pans, a glass or ceramic dish will work, but adjust the cooking time as needed. A long, thin spatula is essential for smooth frosting application, and an offset spatula can make layering the cake easier.
3 Layer Microwave Red Velvet Cake
Ingredients
- 2½ cups all purpose flour (12½oz/ 375g)
- 1½ cups sugar (12oz/ 360g)
- 1 teaspoon cinnamon
- 3 tablespoons cocoa powder sifted
- 1½ teaspoons baking soda
- 1 teaspoon salt
- 2 large eggs at room temperature
- 1 cups vegetable oil (8fl oz/ 240g)
- 1 cup buttermilk (8oz/ 224g)
- 2 tablespoons red food coloring (A gel or paste is best for a strong color)
- 2 teaspoons vanilla extract
My Best Ever Cream Cheese Frosting
Instructions
- To make the 3 layer microwave red velvet cake grease 3 x 7 1/4 inch silicon cake pans and set aside. Note you can use a 6, 8 or 9 inch mold/dish as long as it is microwave safe.
- In a large bowl whisk together the flour, sugar, cinnamon, cocoa powder, baking soda and salt.
- In a separate jug, whisk together the eggs, oil, buttermilk, food coloring and vanilla.
- Whisk the wet ingredients into the dry ingredients until just combined. Don’t be tempted to over mix as this will make for a tough cake.
- Next divide the batter evenly between the 3 silicone cake pans.
- Microwave each layer of the cake separately for 2 minutes and 30 seconds, checking the cake around the 2 minute mark to ensure it does not over bake.
- After microwaving each layer of the cake remove from the microwave and allow to cool completely before turning out onto a flat surface.
- While the cakes are cooling prepare the cream cheese frosting and chill until needed.
- Assemble the cake: Place one cake layer on your cake stand. Gently spoon on about 1/4 cup of the cream cheese frosting.
- Using an offset spatula smooth the frosting out into one thin layer across the cake.
- Stack the next layer of cake on top of the first frosted cake and repeat the process until all 3 layers are stacked and frosted.
- Next frost the outside of the cake. Apply a crumb coat layer to the cake. Use a long, thin spatula to cover the cake completely with a thin and even layer of frosting. Be sure to wipe off your spatula each time you are about to dip it back into the bowl to get more frosting (this way you won’t be transferring any red crumbs into the bowl of frosting). Don’t worry at this point about the crumbs being visible in the frosting on the cake.
- When your cake has a thin layer of frosting all over it, place it into the refrigerator for 30 minutes to “set” the frosting.
- Once the first layer of frosting is set, apply the 2nd layer. Start by adding a large scoop of frosting onto the top of the cake. Use a long, thin spatula to spread the frosting evenly across the top and then spread it down the sides of the cake too. You shouldn’t have any red crumbs floating around in the final frosting layer now, but some might sneak in :).
- Generously swirl the cream cheese frosting on the top of the cake to create those classic swirls of frosting.
- Lastly decorate the top of the cake with red velvet crumbs or as desired.
- To store, cover the cake with cling wrap and place in the fridge for up to 4 days.

