
These adorable Cake Pops in Ice Cream Cones are a delightful twist on two beloved treats, combining the rich, moist crumb of cake with the crisp, sweet crunch of a cone.
Perfect for parties or a fun kitchen project, they’re as charming to look at as they are delicious to eat. With just 30 minutes of prep and a bit of patience while they chill, you’ll create bite-sized wonders that are sure to impress.
The creamy frosting binding the cake crumbs adds a luscious texture, while the chocolate coating provides a glossy, indulgent finish. Each bite offers a harmonious blend of soft, crunchy, and velvety layers, making these treats irresistible. Whether you’re sharing them with friends or savoring them solo, these cake pops are a guaranteed crowd-pleaser.
What You’ll Need for Cake Pops in Ice Cream Cones
- For the cake pops:
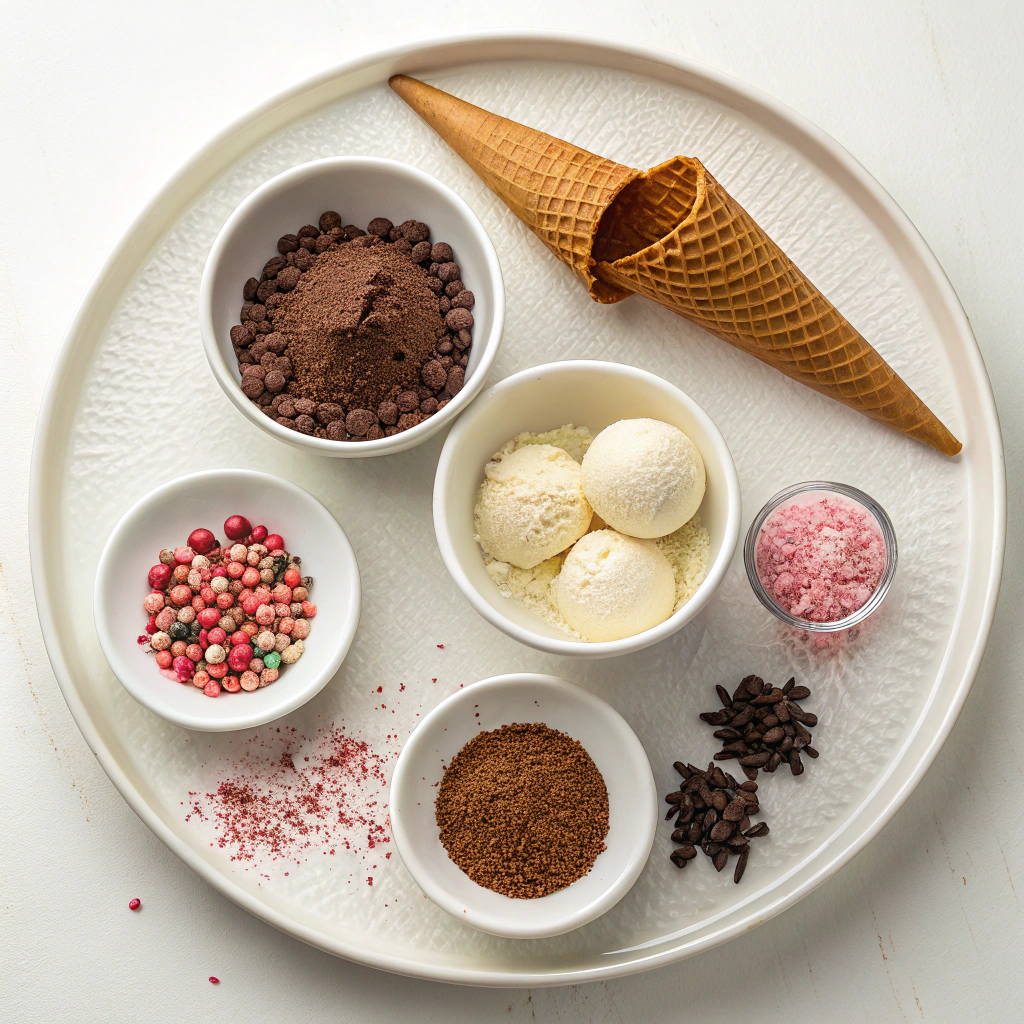
- 1 ⅓ cups (8 oz/225 g) bittersweet chocolate, very finely chopped (use high-quality chocolate for best results)
- 1 cup (8 fl oz/240 ml) heavy whipping cream
- 3 cups (8 oz/225 g) unfrosted chocolate cake, crumbled (store-bought or homemade works)
- 13 ice cream sugar cones
- For the topping:
- 1 cup (6 oz/170 g) white chocolate, finely chopped
- 1-2 drops red food coloring (adjust for desired shade of pink)
- ½ cup (3 oz/85 g) milk chocolate, finely chopped
- Sprinkles (for decoration)
How to Make Cake Pops in Ice Cream Cones
- Make the ganache: Place the bittersweet chocolate in a medium, heatproof bowl. Heat the cream in a heavy-bottomed saucepan until simmering, then immediately pour it over the chocolate. Let sit for 5 minutes without stirring. Whisk gently, starting in the center and widening the circle, until the ganache is smooth and emulsified.
- Make the cake balls: Mix ½ cup (4 oz/115 g) of the ganache with the cake crumbs until evenly combined and the mixture holds together. Divide into 13 equal portions, roll into compact balls, and refrigerate to firm up.
- Prepare the cones: Poke 13 evenly spaced holes (about ½-inch/12 mm wide) in the lid of a small cardboard box. Measure 3 inches (7 ½ cm) from the bottom tip of each cone and trim the tops with a serrated knife. Place the trimmed cones in the holes of the box lid and fill each with ganache.
- Assemble the cake pops: Dip the bottom of each chilled cake ball in a little ganache and place it securely on top of a cone. Return to the refrigerator for 1 hour, or until completely set and hard.
- Decorate the cake pops: Melt the white chocolate in a double boiler over simmering water and stir in 1-2 drops of red food coloring. Dip each cake pop into the warm white chocolate and return to the cardboard stand. Refrigerate for 30 minutes, or until the coating is set.
- Add finishing touches: Melt the milk chocolate and drizzle it over the cake pops. Top with sprinkles and let set. Allow the cake pops to sit at room temperature for at least 2 hours (up to 2 days) before eating to soften the ganache.
- Store: Keep in a covered container at room temperature for up to 2 days or refrigerate for up to 2 weeks. Bring to room temperature before serving if refrigerated.
Creative Topping Ideas to Elevate Your Cake Pops
While the recipe calls for a classic drizzle of milk chocolate and sprinkles, you can get creative with your toppings! Try using crushed nuts, shredded coconut, or edible glitter for a unique twist. For a fruity flavor, drizzle with melted raspberry or strawberry chocolate. If you’re feeling adventurous, add a pinch of sea salt to balance the sweetness.
Perfect Serving Suggestions for Any Occasion
These cake pops in ice cream cones are perfect for parties, birthdays, or even as a fun dessert for kids. Arrange them in a cupcake stand or a decorative holder for a stunning display. Pair them with a scoop of vanilla ice cream or a dollop of whipped cream for an extra indulgent treat. They’re also great as edible party favors—wrap them in cellophane bags tied with a ribbon!
Time-Saving Tips for Busy Bakers
To save time, use store-bought chocolate cake instead of baking from scratch. You can also prepare the ganache and cake balls a day ahead and store them in the fridge. When trimming the cones, use kitchen shears for quicker, cleaner cuts. For faster chilling, place the assembled cake pops in the freezer for 15-20 minutes instead of the fridge.
Storage and Reheating Tips for Freshness
Store your cake pops in an airtight container at room temperature for up to 2 days or in the fridge for up to 2 weeks. If refrigerated, let them sit at room temperature for about 30 minutes before serving to soften the ganache. Avoid freezing, as the texture of the ganache and chocolate coating may change.
Common Questions Answered
Can I use milk chocolate instead of bittersweet? Absolutely! Milk chocolate will make the ganache sweeter and creamier. What if I don’t have a double boiler? Simply place a heatproof bowl over a pot of simmering water, ensuring the bowl doesn’t touch the water. Can I make these gluten-free? Yes, use gluten-free cake crumbs and cones for a delicious alternative.
Cake Pops in Ice Cream Cones
Ingredients
For the cake pops
- 1 ⅓ cups bittersweet chocolate, very finely chopped
- 1 cup heavy whipping cream
- 3 cups unfrosted chocolate cake, crumbled
- 13 ice cream sugar cones
For the topping
- 1 cup white chocolate, finely chopped
- 1-2 drops red food coloring
- ½ cup milk chocolate, finely chopped
- Sprinkles
Instructions
- Make the ganache: Place the bittersweet chocolate in a medium, heatproof bowl. Set aside.
- Heat the cream in a heavy bottomed saucepan until simmering. Immediately pour it over the chopped chocolate and let it sit there for 5 minutes without stirrring at all.
- Using a whisk and starting in the center, begin to stir the chocolate and cream together with a small, circular motion, and gradually widening the circle as the ganache comes together. Stop as soon as it is emulsified.
- Make the cake balls: Mix ½ cup (4 oz/115 g) of the ganache with the cake crumbs until it is evenly mixed and holds together. Divide the cake mixture into 13 equal portions and roll each into a compact ball. Refrigerate to firm up while you get the cones ready.
- Prepare the cones: First poke 13 evenly spaced holes (about ½-inch/12 mm wide) in the lid if a small cardboard box. Set aside.
- Measure 3-inches (7 ½ cm) from the bottom tip of each cone and, using a serrated knife, very carefully trim anything remaining off the top. Place the trimmed cones in the holes of the box lid, then fill each one to the top with ganache.
- Assemble the cake pops: Dip the bottom of each chilled cake ball in a little bit of remaining ganache and place it securely on top of the cone. Return to the refrigerator for 1 hour, or until completely set and hard.
- Decorate the cake pops: Melt the white chocolate in a double boiler over simmering water and stir in 1 drop of red food coloring. If you want a darker pink shade, add a second drop. Transfer to a small bowl.
- Working quickly so that the dark chocolate ganache doesn’t melt, dip in your cake pops into the warm white chocolate and return them to your cardboard stand. Refrigerate for about 30 minutes or until the coating is set.
- Melt the milk chocolate in a small bowl in the microwave or in a double boiler over simmering water, then drizzle over each cake pop. Top with some sprinkles and let set.
- Allow the cake pops to sit at room temperature for at least 2 hours (and up to 2 days) before eating to allow the ganache to soften.
- Store in a covered container at room temperature for up to 2 days or refrigerate for up to 2 weeks. (Bring back up to room temperature before eating if refrigerated.)