

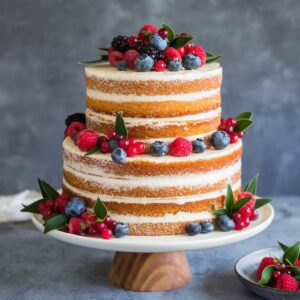
The “Naked” Wedding Cake is a stunning, rustic masterpiece that celebrates simplicity and elegance in every bite. With its soft, tender crumb and rich, buttery flavor, this cake is a true crowd-pleaser. The exposed layers reveal a delicate texture, while the creamy frosting adds a luscious contrast that melts in your mouth. Perfect for any celebration, it’s a dessert that feels both indulgent and effortlessly chic.
In just under two hours, you can create this showstopping cake that’s as delightful to make as it is to savor. The hints of vanilla and subtle sweetness make it a versatile treat, while the airy layers ensure every slice is light yet satisfying. Whether for a wedding or a cozy gathering, this cake promises to leave a lasting impression with its irresistible charm and unforgettable taste.
Ingredients for “Naked” Wedding Cake
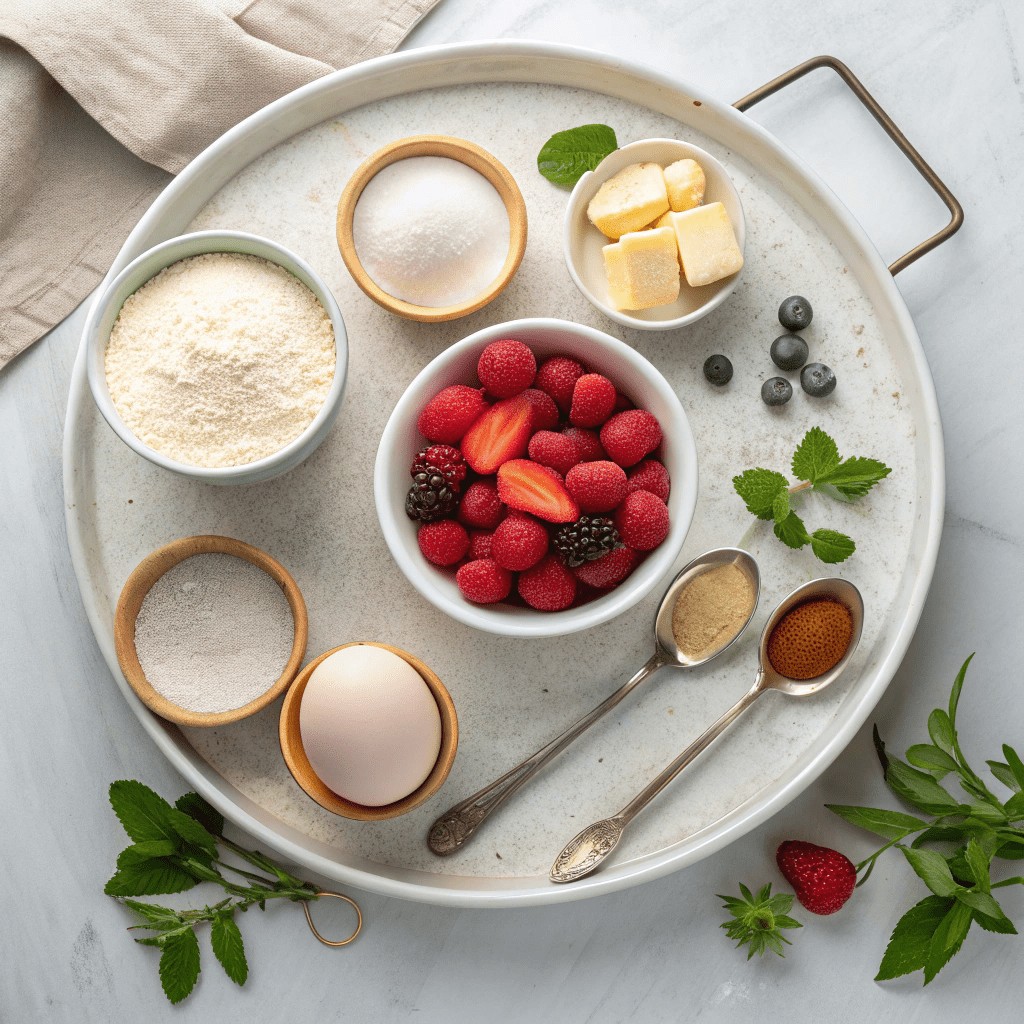
- For the Cake:
- 4 cups (2 lbs) butter, at room temperature
- 4 cups (2 lbs) sugar
- 16 large free-range eggs
- 8 tsp vanilla extract
- 4 cups (2 lbs) all-purpose flour, sifted (you may need a bit extra)
- 6 tsp baking powder
- 1 tsp salt
- For the Vanilla Buttercream Frosting:
- 3 cups butter, at room temperature
- 6 cups icing sugar, sifted
- 6 tbsp milk
- 4 tsp vanilla extract
- For Decoration:
- Raspberry or strawberry jam
- Fresh seasonal berries (strawberries, raspberries, blueberries)
- Powdered sugar, for dusting
- Greenery (e.g., little leaves, baby’s breath)
Step-by-Step Instructions
- Preheat the oven to 350°F (175°C). Line the bottom of 10-inch, 8-inch, and 6-inch cake tins with greaseproof paper and grease with butter.
- Cream butter and sugar: In a stand mixer or with a hand mixer, cream together the butter and sugar until pale and creamy. Beat well to incorporate air.
- Whisk eggs and vanilla: In a jug, whisk the eggs and vanilla together. With the mixer on high speed, beat in the eggs one at a time. If the mixture curdles, add 1 tbsp of flour.
- Combine dry ingredients: Sift together the flour, baking powder, and salt. Fold the flour mixture into the wet ingredients using a large metal spoon or mix on low speed. Avoid over-mixing.
- Fill cake tins: Pour the mixture into the prepared cake tins, filling them 2/3 of the way up. Level with a spatula.
- Bake: Place in the oven and bake for 35-40 minutes (larger cakes may take longer). The cakes are done when they are well-risen, spring back when pressed gently, and a skewer inserted into the middle comes out clean.
- Cool: Remove from the oven and let cool in the tins for 5 minutes. Then, transfer to a wire rack, peel off the paper, and let cool completely (about 2 hours). For best results, make the cakes the day before frosting.
- Make the buttercream frosting: On medium speed, beat the butter for 8-10 minutes until pale. Gradually add powdered sugar on low speed. Scrape the bowl with a spatula, then add milk, vanilla, and salt. Beat on medium speed for 5 minutes until fluffy. Chill before use.
- Cut and layer: Cut each cake into 2 even layers using a long carving knife. Frost each layer with buttercream and jam.
- Create the “naked” look: Use a palette knife to smooth the buttercream around the edges of the cake for a rustic appearance. Dust each cake with powdered sugar.
- Assemble the tiers: Carefully place the largest cake on a serving dish or cake stand, followed by the second and top tiers. Use cake boards between layers for extra support if needed.
- Decorate: Arrange fresh berries and greenery around the cake. Start with a little, step back, and add more as needed.
- Serve: This cake is best served at room temperature. Enjoy immediately for the freshest taste!
Perfecting the Naked Look
To achieve that rustic, “naked” cake aesthetic, focus on smooth, even layers of buttercream between the cake tiers. Use a palette knife to gently scrape off excess frosting from the sides, leaving just enough to peek through. Dusting with powdered sugar adds a delicate finish—don’t forget the sides for a cohesive look. Remember, less is more for this style!
Decorating with Freshness
Elevate your cake with seasonal berries and greenery. Start with a few strawberries, raspberries, and blueberries, then add sprigs of baby’s breath or small leaves for a natural touch. Step back occasionally to assess the balance—it’s easy to add more, but harder to remove once placed. This combination not only looks stunning but also complements the cake’s flavors.
Time-Saving Tips for Busy Bakers
Bake the cake layers a day ahead to save time and ensure they’re fully cooled before frosting. If you’re short on time, use store-bought jam for the filling instead of making your own. For the buttercream, beat the butter thoroughly before adding sugar—this step is key to achieving that light, fluffy texture without extra effort.
Storage and Serving Suggestions
This cake can stay at room temperature for up to 24 hours, but keep it covered to prevent drying. If you need to store it longer, refrigerate it in an airtight container and bring it to room temperature before serving. For a polished presentation, use a cake stand and slice with a sharp, serrated knife for clean cuts.
Recipe Variations to Try
Experiment with different flavors by swapping the vanilla extract for almond or lemon in both the cake and frosting. For the filling, try apricot or blackberry jam instead of raspberry or strawberry. If you’re feeling adventurous, add a layer of fresh fruit slices between the cake tiers for extra texture and flavor.
“Naked” Wedding Cake
Ingredients
Cake Ingredients
- 4 cup butter, at room temperature
- 4 cup sugar
- 16 large free-range eggs
- 8 tsp vanilla extract
- 4 cup all-purpose flour, sifted you may need a bit extra
- 6 tsp baking powder
- 1 tsp salt
Vanilla Buttercream Frosting
- 3 cups Butter, at room temperature
- 6 cups Icing sugar, sifted
- 6 tbsp Milk
- 4 tsp Vanilla extract
To Decorate the Cake
- Raspberry/Strawberry jam
- Fresh seasonal berries like strawberries, raspberries and blueberries
- powdered sugar, for dusting
- Greenery, like little leaves and babies breath
Instructions
- Preheat the oven to 350F.
- For the wedding cake I made, use 10 in., 8 in. & 6 in. cake tins.
- Line the bottom of the cake tins with a circle of greaseproof paper & grease with butter.
- On a stand mixer or hand mixer, cream together the butter and sugar until pale and creamy. Beat well to ensure you get lots of air into the mixture.
- In a jug whisk the eggs & vanilla together.
- With the mixer on high speed, beat in the eggs one at a time. You want to avoid the mixture curdling, so that it stays airy. If it does curdle, add a tbsp of flour.
- Sift together the flour, baking powder & salt. Fold the flour mixture into the wet ingredients using a large metal spoon or mix on low speed. Take wet mix off the stand mixer & fold in by hand if there is too much flour for the bowl. Be careful not to over-mix.
- Pour the mixture into the cake tins & fill 2/3 the way up the tin. Level with the spatula.
- Place in the oven & bake for about 35-40 minutes (the bigger cakes take longer), or until the cakes are well-risen, spring back when pressed gently with a finger and a skewer inserted into the middle comes out clean.
- Remove from the oven and set aside for 5 minutes, then remove from the tin and peel off the paper. Place onto a wire rack and let cool completely, about 2 hours. I suggest you make the cakes the day before to make it easier to frost.
- While they are cooling, make the Buttercream frosting. On Medium speed beat the butter for about 8-10 minutes on its own. This makes a huge difference in the end so be patient and you will be rewarded with amazing frosting.
- When pale in color, add powdered sugar spoonful by spoonful on Low speed. This helps make a fluffy frosting too.
- Turn off the mix and run a spatula under and around the frosting to make sure all ingredients are incorporated. Add milk, vanilla and salt and beat on medium speed for another 5 minutes. The frosting will almost double in size and will be so fluffy and pale in color. It helps to chill your frosting before use so it’s not too soft.
- Cut 2 layers into each cake. When cutting get down to the level of the cake. Use a long carving knife and slowly cut through. This helps to get an even layer straight across.
- Frost each cake separately with the buttercream and jam.
- How to get that Naked look: With the buttercream that comes out over the edges of the cake, use a palette knife and smooth it around the cake. This is what gives your rustic look.
- Dust each cake separately with powdered sugar. Try to get it on the sides also, it looks good.
- Lift your largest cake carefully onto your serving dish or cake stand. Followed by the second and then the top tier. You can separate the layer with a cake board if you wish for extra support. I didn’t.
- This is the best part- Decorate around the cake with the berries and then with the greenery and babies breath. Start off with a little at first, stand back and look and add more if needed.
- This cake will live happily at room temperature. This recipe is multiplied for a 3 tiered cake. Divide the ingredients by 4 for one 8 inch cake. The cake is best if you make the cake the day before and then frost the next day and serve. Because it is ‘Naked’ and not frosted on the outside it may get a little dry around the sides if left out too long, a good reason to eat it up fast!

