

This No-Bake OREO Cheesecake is a dreamy dessert that combines creamy indulgence with a satisfying crunch. In just 30 minutes, you’ll create a luscious treat with velvety cheesecake filling and a rich, chocolatey OREO crust. Perfect for busy days or last-minute cravings, it’s a fuss-free recipe that delivers big on flavor and texture.
Every bite is a delightful contrast of smooth, airy cheesecake and the bold, crumbly OREO base. The hint of vanilla and the deep cocoa notes make it irresistibly decadent. Whether you’re hosting a gathering or treating yourself, this dessert is sure to impress with its effortless elegance and crowd-pleasing appeal.
Ingredients for No-Bake OREO Cheesecake
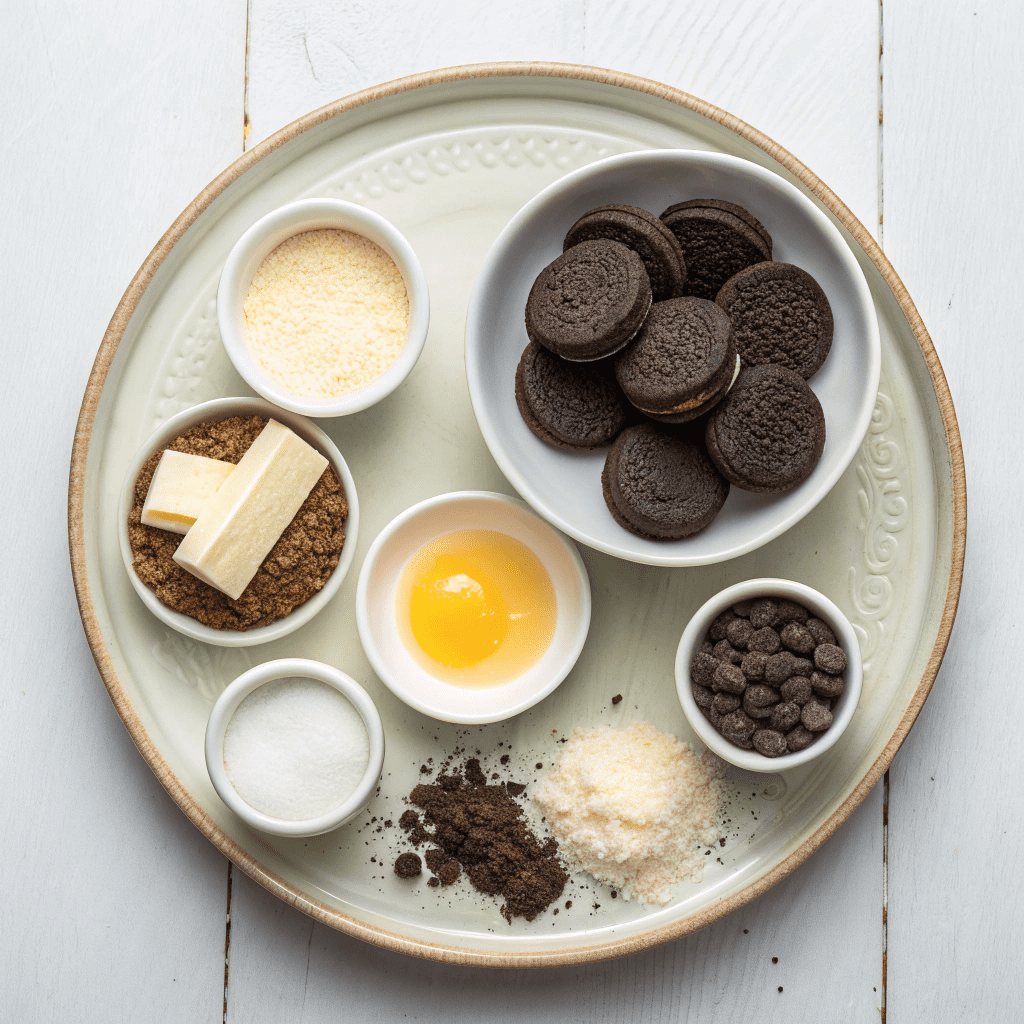
- Crust:
- 2 ½ cups (2 sleeves, 22 cookies, 7.5 oz/213g) crushed OREO cookies
- ⅓ cup (2.5 oz/71g) unsalted butter, melted
- Cheesecake Filling:
- 3 cups (24 oz/675g) cream cheese, room temperature
- 2 ¼ cups (18 fl oz/507g) cream (whipping or all-purpose)
- ⅔ cup (5 oz/142g) sugar
- 2 teaspoons vanilla extract
- 1 ½ cups (4.5 oz/128g) OREO cookies, crushed
- Ganache:
- ⅔ cup (4 oz/115g) chocolate (dark or semi-sweet)
- ½ cup (4 oz/115g) cream
Step-by-Step Instructions
- Prepare the Crust: Combine the crushed OREO cookies with melted butter in a bowl. Mix until evenly coated. Press the mixture firmly into the base of a 9-inch springform pan. Refrigerate while preparing the filling.
- Make the Cheesecake Filling: In a large bowl, beat the cream cheese, sugar, and vanilla extract with a whisk attachment on high speed until smooth and lump-free (about 3-5 minutes). Scrape the sides and bottom of the bowl to ensure no lumps remain.
- Pour in the cream and continue whipping until the mixture thickens and increases in volume. Gently fold in the crushed OREO cookies.
- Assemble the Cheesecake: Pour half of the cheesecake filling into the prepared crust. Add a layer of whole or crushed OREO cookies as a “secret” layer. Spoon the remaining filling on top and smooth the surface. Refrigerate while making the ganache.
- Prepare the Ganache: Heat the cream in a small pot until it simmers. Pour the hot cream over the chocolate and let it sit for 1-2 minutes to melt. Whisk until smooth and glossy.
- Pour the ganache over the cheesecake, spreading it evenly. Refrigerate the cheesecake for at least 8 hours or overnight to set. (It can be made up to 2 days in advance.)
- Serve: Run a palette knife or thin spatula around the edges of the pan to release the cheesecake. Remove the springform ring, slice, and serve. Garnish with whipped cream and mini OREO cookies. Enjoy!
Creative Topping and Garnish Ideas
Elevate your No-Bake OREO Cheesecake with fun and delicious toppings! Try drizzling caramel or chocolate sauce over the ganache for extra decadence. For a crunchy twist, sprinkle crushed Oreos or chopped nuts on top. Fresh berries like strawberries or raspberries add a pop of color and a refreshing contrast. Don’t forget to garnish with mini Oreos for that classic touch!
Perfect Pairings for Serving
This cheesecake is a showstopper on its own, but pairing it with the right accompaniments can take it to the next level. Serve with a dollop of whipped cream or a scoop of vanilla ice cream for a creamy contrast. A cup of coffee or a glass of cold milk complements the rich flavors perfectly. For a dessert platter, add brownies or chocolate truffles for a chocolate lover’s dream!
Storage Tips for Freshness
Store your cheesecake in the refrigerator, covered with plastic wrap or in an airtight container, for up to 5 days. If you need to freeze it, wrap individual slices tightly in plastic wrap and place them in a freezer-safe bag for up to 2 months. Thaw in the fridge overnight before serving. Remember, the ganache may lose its shine after freezing, but the taste will still be amazing!
Time-Saving Hacks for Busy Bakers
Short on time? Use pre-crushed Oreo crumbs for the crust to skip the crushing step. Opt for store-bought whipped cream instead of making your own for the topping. You can also prepare the cheesecake filling and crust a day in advance, then assemble and refrigerate it the next day. These small tweaks can save you precious minutes without compromising on flavor!
Equipment You’ll Need
To make this recipe a breeze, ensure you have the right tools. A 9-inch springform pan is essential for easy removal of the cheesecake. A stand mixer or hand mixer will make whipping the filling smooth and effortless. A spatula is handy for scraping down the bowl and folding in the Oreos. Lastly, a small pot and whisk are perfect for preparing the ganache. Happy baking!

No-Bake OREO Cheesecake
Ingredients
CRUST
- 2 ½ cup crushed oreo cookies 2 sleeves (22 cookies) (71/2oz/213g)
- 1/3 cup unsalted butter, melted 21/2oz/71g
CHEESECAKE
- 3 cups cream cheese, room temperature 24oz/675g
- 2 ¼ cups cream (whipping/all purpose) 18floz/507
- ⅔ cup sugar 5oz/142g
- 2 teaspoon vanilla extract
- 1 ½ cups Oreo Cookies, crushed 41/2oz/128g
GANACHE
- 2/3 cup Chocolate 4oz/115g
- 1/2 cup Cream 4oz115
Instructions
- To make the cheesecake base: Combine Oreo crumbs with the melted butter and mix
- Press into pan your springform cheesecake tin (9 inches). Set in the fridge and start on the filling.
- To Make the Cheesecake filling: Add cream cheese, sugar, vanilla extract, to a bowl and beat with a whisk attachment on High speed until smooth and there are no lumps, approximately 3-5 minutes.
- Run a spatula under the mix to make sure there are no cream cheese lumps.
- Pour in the cream and continue whipping until the mix thickens and becomes bigger in size.
- Gently fold in Oreo cookies (or whatever cookie/candy bars you like)
- Pour ½ the cheesecake filling into your prepared tin. Add your ‘secret’ oreo layer, then spoon on the rest of the filling. Refrigerate while you make the ganache.
- For the Ganache: Heat the cream in a pot until it reaches a simmer. Pour directly over the chocolate and let it melt. Whisk.
- Pour the cool ganache over the cheesecake while in the tin.
- To Set the Cheesecake: Refrigerate for at least 8 hours to set or overnight for best results. It has no gelatin so it needs longer than a regular cheesecake. You can make this 2 days in advance
- To remove from the tin run a palette knife or thin spatula around the edges to free it from the tin. Serve with whipping cream and garnish with mini Oreos. Enjoy!

