

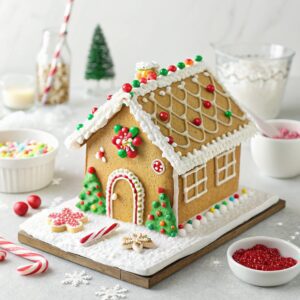
There’s something magical about crafting your own gingerbread house, and this ultimate kit makes it effortless and unforgettable. With a perfect balance of warm spices, rich molasses, and a crisp, golden texture, every bite is a holiday delight. The dough is sturdy yet tender, ensuring your creation stays intact while still being delicious. Spend a cozy afternoon shaping, baking, and decorating—just 3 hours of prep and 4 hours of drying time will bring your edible masterpiece to life.
This recipe isn’t just about building a house; it’s about creating memories with loved ones. The aroma of ginger and cinnamon fills your kitchen, while the smooth icing and colorful candies add playful texture and sweetness. Whether you’re a seasoned baker or a first-time decorator, this gingerbread house kit promises a joyful, stress-free experience. Gather your family, unleash your creativity, and savor the festive flavors of the season.
What You’ll Need for the Ultimate Gingerbread House Kit
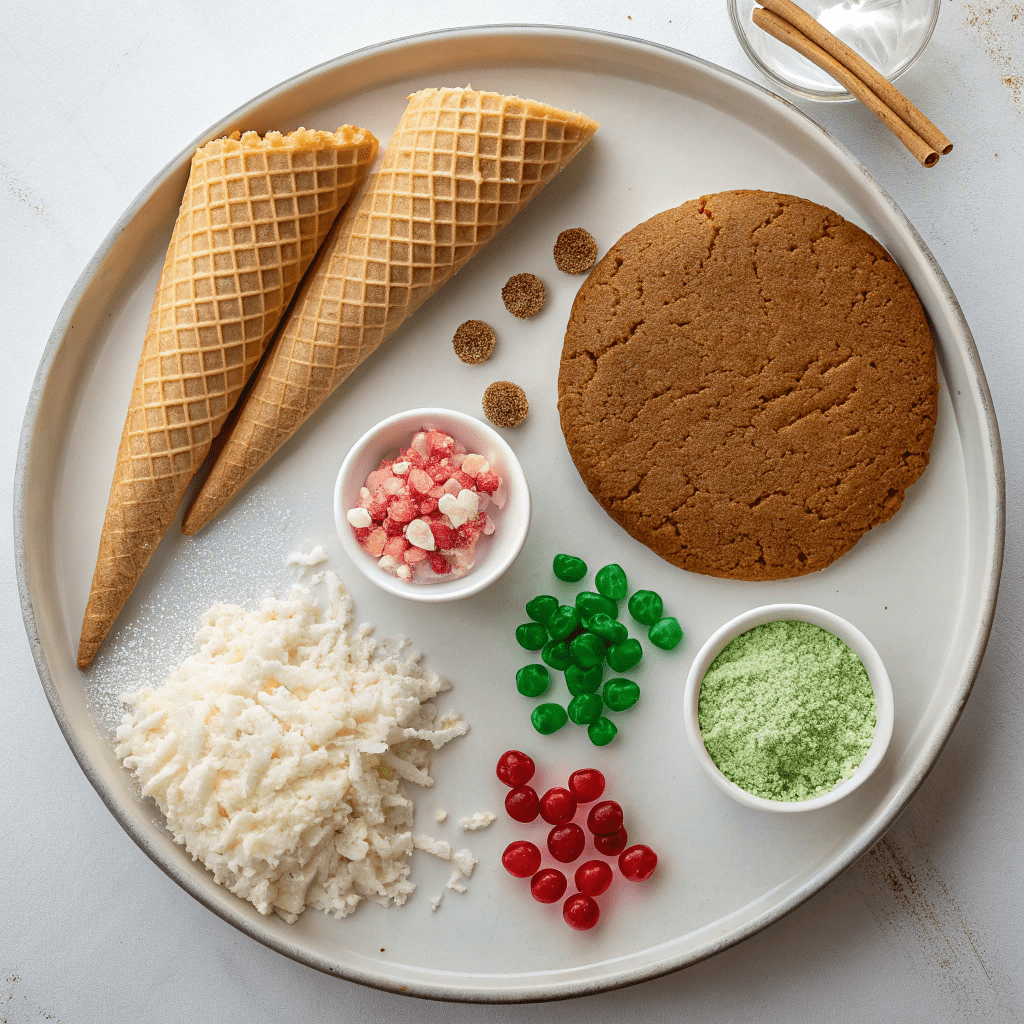
- 1 batch gingerbread dough (homemade or store-bought)
- 1 batch royal icing (make it very stiff for better structure)
- Frosted Mini Wheats (for a tiled roof effect)
- Mini gumdrop candies (for colorful decorations)
- Green and red food coloring (for festive details)
- 3 Sugar Ice Cream Cones (to create trees)
- Shredded coconut (for a snowy landscape)
Step-by-Step Guide to Building Your Gingerbread House
- Prepare the gingerbread cookies: On a lightly floured surface, roll the dough to 1/4-inch thickness. Use a sharp knife and a gingerbread house stencil to cut out the pieces. Bake at 350°F (180°C) for 15-18 minutes, or until edges are lightly golden. Let cool completely.
- Preliminary decorating: Fill a piping bag with plain royal icing and a #4 tip. Pipe decorative designs (e.g., spirals) on the 4 side cookies. Attach Frosted Mini Wheats to the 2 roof cookies with icing to create a tiled roof, leaving space for the chimney. Let dry for 1-2 hours.
- Assemble the house frame: Start with 2 side cookies. Pipe icing on one edge of a cookie and attach it to the matching edge of the second cookie to form a 90° angle. Reinforce the inside corner with more icing. Hold in place for 2-3 minutes until stable. Attach the bottom edges to a cake board. Repeat with the remaining cookies to create a 4-sided structure. Let dry for 1-2 hours.
- Attach the roof: Pipe icing on the top edges of the structure and attach the left side of the roof. Hold until stable, then repeat with the right side. Reinforce the top seam with icing. Attach the chimney using the same method as the sides.
- Decorate the house: Use icing to attach gumdrop candies along the front roof edge and top of the house. For vines, dye some icing green and pipe leaf designs with a #352 tip on the corners, windows, and roof edges.
- Create the trees: Cut the ice cream cones crosswise halfway. Using green icing and the #352 tip, pipe leaves in a circular pattern to cover the cones completely.
- Add festive details: Decorate the door cookie with a green wreath and red holly berries. Once the green icing is dry, pipe plain icing on top of the leaves and vines for a snowy effect.
- Finish the landscape: Sprinkle shredded coconut around the house to create a snowy ground.
Time-Saving Tips for Gingerbread House Success
To streamline your gingerbread house project, consider prepping the dough and royal icing a day in advance. Store the dough in the fridge and the icing in an airtight container. Use pre-made stencils or templates for precise cookie cutting, and enlist helpers for decorating to make the process faster and more fun!
Creative Decorating Ideas to Wow Your Guests
Elevate your gingerbread house with unique touches like crushed peppermint candies for a snowy path, edible glitter for a magical sparkle, or mini marshmallows as fluffy snow piles. Add personality with piped icing details like snowflakes, icicles, or even a tiny gingerbread family standing by the door.
Storage Tips to Keep Your Gingerbread House Fresh
Once assembled, store your gingerbread house in a cool, dry place away from direct sunlight. Cover it loosely with plastic wrap or place it in a large, airtight container to prevent dust or moisture. It can last up to 2 weeks, though it’s best enjoyed within the first few days for optimal freshness.
Essential Equipment for a Smooth Building Process
Make sure you have a sturdy cake board or base to support your house, a sharp knife or pizza cutter for clean cookie edges, and a variety of piping tips for detailed decorations. A small offset spatula can also be handy for spreading icing smoothly on larger surfaces.
Fun Variations to Customize Your Gingerbread House
Experiment with different themes like a cozy log cabin using pretzel sticks, a candy castle with colorful licorice, or a winter wonderland with blue-tinted icing and silver dragees. Swap shredded coconut for powdered sugar for a lighter snow effect, or add a chocolate pathway with crushed cookies.
The Ultimate Homemade Gingerbread House Kit
Ingredients
Gingerbread Dough
- 1 batch gingerbread dough
Royal Icing
- 1 batch royal icing (very stiff)
Decorations
- Frosted Mini Wheats
- Mini gumdrop candies
- Green food coloring
- Red food coloring
- 3 Sugar Ice Cream Cones
- Shredded coconut
Instructions
- To make the gingerbread house cookie: On a lightly floured surface, roll dough to 1/4 in. thickness. Cut out your cookies with a sharp knife and the gingerbread house stencil.
- Bake at 350°F (180°C) for roughly 15-18 minutes. Allow to fully cool before decorating.
- To preliminary decorate the gingerbread house: Fill a piping bag with plain royal icing and a #4 piping tip. Pipe decorative designs on the 4 side cookies. I chose to use a spiral design.
- Attach frosted mini wheats with royal icing on the 2 roof cookies for a tiled roof. Leave a blank space on the roof for the chimney.
- Allow the royal icing to fully dry at room temperature before assembling the house, about 1-2 hours.
- To assemble the gingerbread house: Start with the 2 side cookies of the house. Pipe icing on 1 edge of a cookie then line it up with the matching edge of the second cookie to create a 90° angle. Reinforce the attached edge by piping icing on the inside of the cookies at the 90° corner. Hold the 2 sides in place until the royal icing is dry enough to provide stability, about 2-3 minutes. Attach the bottom edges of the house with icing onto a cake board.
- Repeat with the remaining 2 side cookies until you have a 4 sided structure. Allow the frame to dry for roughly 1-2 hours just to make sure it will hold the roof once placed on.
- For the roof, pipe icing on the left top edges of the structure and attach the left side of the roof. Hold the roof in place until the icing is dry enough to attach the second side. Repeat with the right part of the roof. Reinforce the top of the roof with icing.
- Attach the chimney cookies on top of the roof. Follow the method used to build the sides of the house in step 6.
- To decorate the gingerbread house: Using icing, attach the gumdrop candies along the front roof edge and top edge of the house.
- To make vines, dye some icing with green food coloring and fill a piping bag with a #352 tip. Pipe leaf and vine designs on the 4 corners of the house, the windows, and the front roof edge.
- To make a tree, cut the ice cream cones crosswise about halfway with a serrated knife. Using the green icing and #352 tip, start from the bottom and pipe leaves along the side of the cone. Continue to pipe up in a circular pattern to completely cover the cone.
- Using the green royal, decorate the door cookie with a wreath design. Dye some icing with red food coloring and pipe holly berries on the wreath.
- Once the green icing is fully dry, add a snowy effect by piping plain icing on top of the leaves and vines.
- To finish the gingerbread landscape, sprinkle shredded coconut along the grounds of the house for snow.

