The Ultimate Homemade Gingerbread House Kit
There’s something magical about crafting your own gingerbread house, and this ultimate kit makes it effortless and unforgettable. Spend a cozy afternoon shaping, baking, and decorating—just 3 hours of prep and 4 hours of drying time will bring your edible masterpiece to life.
Ingredients
Gingerbread Dough
- 1 batch gingerbread dough
Royal Icing
- 1 batch royal icing (very stiff)
Decorations
- Frosted Mini Wheats
- Mini gumdrop candies
- Green food coloring
- Red food coloring
- 3 Sugar Ice Cream Cones
- Shredded coconut
Instructions
- To make the gingerbread house cookie: On a lightly floured surface, roll dough to 1/4 in. thickness. Cut out your cookies with a sharp knife and the gingerbread house stencil.
- Bake at 350°F (180°C) for roughly 15-18 minutes. Allow to fully cool before decorating.
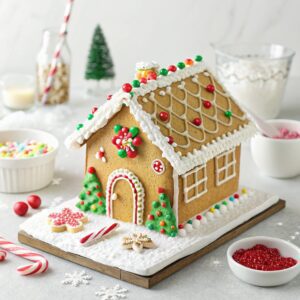
- To preliminary decorate the gingerbread house: Fill a piping bag with plain royal icing and a #4 piping tip. Pipe decorative designs on the 4 side cookies. I chose to use a spiral design.
- Attach frosted mini wheats with royal icing on the 2 roof cookies for a tiled roof. Leave a blank space on the roof for the chimney.
- Allow the royal icing to fully dry at room temperature before assembling the house, about 1-2 hours.
- To assemble the gingerbread house: Start with the 2 side cookies of the house. Pipe icing on 1 edge of a cookie then line it up with the matching edge of the second cookie to create a 90° angle. Reinforce the attached edge by piping icing on the inside of the cookies at the 90° corner. Hold the 2 sides in place until the royal icing is dry enough to provide stability, about 2-3 minutes. Attach the bottom edges of the house with icing onto a cake board.
- Repeat with the remaining 2 side cookies until you have a 4 sided structure. Allow the frame to dry for roughly 1-2 hours just to make sure it will hold the roof once placed on.
- For the roof, pipe icing on the left top edges of the structure and attach the left side of the roof. Hold the roof in place until the icing is dry enough to attach the second side. Repeat with the right part of the roof. Reinforce the top of the roof with icing.
- Attach the chimney cookies on top of the roof. Follow the method used to build the sides of the house in step 6.
- To decorate the gingerbread house: Using icing, attach the gumdrop candies along the front roof edge and top edge of the house.
- To make vines, dye some icing with green food coloring and fill a piping bag with a #352 tip. Pipe leaf and vine designs on the 4 corners of the house, the windows, and the front roof edge.
- To make a tree, cut the ice cream cones crosswise about halfway with a serrated knife. Using the green icing and #352 tip, start from the bottom and pipe leaves along the side of the cone. Continue to pipe up in a circular pattern to completely cover the cone.
- Using the green royal, decorate the door cookie with a wreath design. Dye some icing with red food coloring and pipe holly berries on the wreath.
- Once the green icing is fully dry, add a snowy effect by piping plain icing on top of the leaves and vines.
- To finish the gingerbread landscape, sprinkle shredded coconut along the grounds of the house for snow.
Tried this recipe?Let us know how it was!